As you spend more time around music and musicians, you’ll surely run into the pentatonic scale. It’s everywhere in music. For guitar players the pentatonic scale plays a critical role.
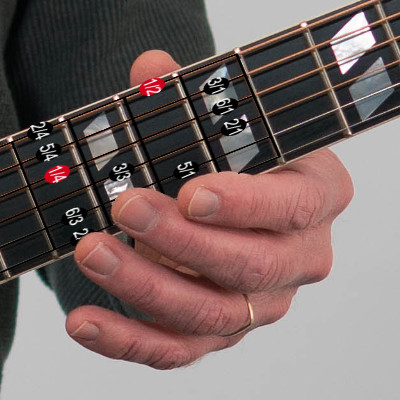
What is the pentatonic scale?
The pentatonic scale is a musical scale which consists of five of the seven major or minor scale notes. The major pentatonic scale consists of the 1, 2, 3, 5, and 6 degrees of the major scale. The minor pentatonic scale consists of the 1, 3b, 4, 5, and 7b degrees of the natural minor scale.
The pentatonic scale contains no half steps between notes. The lack of half steps removes the innate tension of the full seven-note scales. This provides an incredibly comfortable vehicle for creating melodies, lead lines, and musical improvisations.
It might be easier to think in terms of the familiar Do, Re, Mi of Solfège. For instance, most everyone knows and can sing a major scale as Do, Re, Mi, Fa, Sol, La, Ti, Do. By contrast, the major pentatonic scale looks like, Do, Re, Mi, Sol, La, and back to Do.
If you need a refresher on the major scale, see my Understanding the major scale is foundational music theory article.
Where did the pentatonic scale originate?
Pentatonic scale has existed in diverse cultures across the world and throughout history. In fact, it seems ubiquitous among humans. Evidence of it has been found in wide-ranging cultures that include ancient African, Native American, and Asian traditions. Gregorian chants relied heavily on the pentatonic scale notes.
It seems to have been everywhere. The oldest instruments so far discovered are recorder-like instruments with holes bored into bird bones. These holes sounded the five notes of the pentatonic scale.
An ancient flute dated to be somewhere around 35,000 years old has been found in Germany. Other claims date similar primitive flutes to be as old as 50,000 years.
One thing all of these ancient instruments seem to have in common? They’re set up to sound the pentatonic scale.
The scale clearly has ancient roots, and yet it remains as vital to music today as it has ever been. In the modern era of jazz, blues, gospel, folk, country, rock and roll…Name a genre, and there’s a solid chance that it relies heavily upon either the major or minor pentatonic scale. Or both.
Why is the pentatonic scale so “comfortable”?
Clearly, humans have been hearing the scale for thousands of years. That familiarity accounts for a great deal of our comfort with it. But why did it become comfortable in the first place. What was it about the pentatonic scale that appealed to so many diverse cultures?
Lack of half steps relieves tension in the pentatonic scale
As I mentioned, we remove both of the half steps in the major scale and minor scale to form the pentatonic scales. For instance, in the key of C major, you have two half steps. The first from E to F and the second from B back to the C of the next octave.
These half steps introduce tension into the scale because they take the music to an unstable place. This causes the listener’s brain to crave stability, referred to as musical resolution.
The fourth and seventh degrees of the major scale introduce tension
For instance, when you play the major scale and stop with the seventh note, your brain wants very badly to hear the root note again. You will have a difficult time not completing the climb up to the root note of the next octave. Your brain needs that resolution to make the music feel stable and complete.
If you stop instead on the sixth note of the scale, it still won’t feel totally comfortable to you. It still feels a bit incomplete. But you could imagine stopping there. The pull to the root note doesn’t grab you quite as strongly. In other words, less musical tension exists.
Likewise, if you play the first four notes of the scale and stop on the fourth, your brain wants to hear the fifth note to resolve the phrase. The pull isn’t quite as strong as the pull from the seventh to the root note, but still a strong pull. If you then play the fifth note, your brain finds a little rest and comfort.
Now instead stop at the third note. Again, while you don’t necessarily feel totally at home, you don’t feel as strong a pull to a different note. You could stop there and be OK with it.
So, in short, the pentatonic scale feels comfortable because no matter what note you play, you land on a relatively tension-free note. And since that lack of tension leads to the widespread use of the pentatonic scale, we all seem to be innately comfortable with the scale. It’s in our blood, as it seems.
Repetition fosters comfort
Finally, we’ve all heard the pentatonic scale in use throughout our lives. Probably thousands of times. This immersion has further cemented its evolutionary hold on our brains so that it has simply become a part of us.
To see a brilliant demonstration of the truth in this, check out this video of the great Bobby McFerrin. He creatively leads a general audience of not-necessarily musical public in a little experiment. It’s amazing what they accomplish with no prior preparation other than their innate understanding of the pentatonic scale. Simply fascinating.
Why is the pentatonic scale so useful?
The scale is everywhere. Cultures from across the world and across time have used it. Countless songs feature it. Many of the most iconic guitar solos were based exclusively upon it. So, what makes it so useful?
Pentatonic comfort for the listener
The pentatonic scale provides a great avenue to playing music that your listeners can connect to. The sounds of the pentatonic scale sit comfortably with virtually everyone because we’ve all heard it so many times.
People like new and different things. But not too new. People also need comfort.
While I couldn’t verify this, legend has it that Spotify discovered this when a software glitch accidentally included some familiar songs in their new music algorithms. Once they fixed it so that truly only new songs were fed to listeners, they discovered an interesting thing.
Turns out that the new music program popularity fell once familiar songs were removed from the feed.
It seems that we want to hear new material. We want new ideas and new experiences. But at the same time, we crave the right amount of familiarity. We seem to find comfort in those snippets of familiarity that bolster our courage to explore new territory. Without that comfort, we forge ahead more cautiously and don’t enjoy the experience as much.
The same is true for the music your listeners want to hear. They want something fresh. Everyone loves to discover a new song or artist that none of their friends know about. But if the music is too far “out there”, too far away from their comfort zone, the listeners will not embrace it. They won’t like it. And they won’t listen.
The pentatonic scale provides a subtle sense of familiarity that ties your new music in with the music your prospective listeners already know and find comfort in. It’s a critical touch point for the ear/brain connection.
Pentatonic freedom for the musician
The nature of the pentatonic scale gives the musician—particularly solo players and improvisers—an amazing amount of freedom. Interestingly, limiting the player to five notes of the major or minor scale instead of the full seven expands the possibilities rather than limiting them.
Of course, solos and improvisations don’t have to adhere strictly to the pentatonic scale, but basing them off of the scale makes great sense for the soloist.
Recall that the pentatonic comes about by eliminating notes of the parent scales that cause half steps. Eliminating those notes removes a great deal of the character of the major or minor scale. In other words, without those notes, it’s more difficult to identify whether the scale is major or minor.
That could seem like a bad thing, but actually, it opens up great possibilities. You’d naturally think that if you’re playing a song in a major key, you’d have to use a major scale to play a guitar solo for that song. But that’s not always the case. In many cases the minor pentatonic scale can work perfectly well over the top of a progression in a major key.
In fact, you’ve heard exactly this countless times if you listen to the blues, rock and roll, jazz, and other genres.
So, as musicians, the pentatonic scales give us the freedom to potentially play our solos in either a minor or major key scale pattern regardless of the major or minor tonality of the chord progression we’re playing over.
It’s a little bit of the blues talking
A defining difference between a major scale and a minor scale involves the third degree of the scale.
The major scale contains a major third. In other words, the third sits a full whole tone above the second degree of the scale.
On the other hand, a minor scale uses a flatted third so that only a half step exists between the two and the three.
So what happens when you play a minor pentatonic over a major key chord progression? The flatted third of the minor pentatonic clashes with the major third of the key signature. If you dwell on it, that could sound like a train wreck. But if you pass through it in the course of a lick, well, you have the blues!
We’ve heard this hundreds of times in the blues and everything that sprang from the blues including rock and roll and modern popular music. The discomfort of those clashing tones has become familiar (and thus comfortable) to our listeners and adds a spice to our playing as soloists.
Mix major and minor with caution
Now, it doesn’t always work. Sometimes you might experiment with a minor pentatonic over a major chord progression and it just doesn’t feel right. In that case, switch to the major pentatonic scale!
No rules bind you other than what sounds good. If the minor pentatonic sounds amazing over the major progression, then use it. If not, use the major pentatonic.
Or…use them both. Switch back and forth between the minor pentatonic and the major pentatonic in the same solo and your audience will bow down to your innovative genius! OK, well, maybe that’s a bit much, but it’s true. You can mix the major and minor versions of the pentatonic scale in one song or even a solo and it could sound amazing.
The nuts and bolts of the pentatonic scale
Hopefully you’re convinced that you need to not only learn, but really master the pentatonic scale. So let’s talk about the scales specifically. And in this case, I’ll focus on the guitar since that’s the instrument I play and you likely came here to learn about.
I spent a lot of time talking about what makes the pentatonic scale, what notes it includes, and which have been left out. And that’s really good knowledge for you to have.
The more we understand the construction of music, the better able we become to get creative with it. Anyway, that’s how I feel about it.
Good news with a word of caution for beginners
You don’t have to commit all of those details to memory immediately in order to use the pentatonic scale. Here I’ll talk about the scale and show you different patterns you can use to play it. So you can experiment with it immediately.
But let me just offer a word of caution: don’t let the simplicity of learning these patterns distract you from understanding what you’re doing with them. And more importantly, what you have the potential to do with them.
Keep an active mind toward really learning the pentatonic scale
I speak from experience. For years I played guitar solos using these patterns (or if I’m honest, just a couple of them) without really understanding what was going on. I got by, you could say.
Trust me; the last thing you want to do when up on stage trying to knock the socks off of your audience with an inventive solo is to just “get by” with what you know.
I think back on those solos now and I realize how limited they were. How uninspired my playing was. It’s kind of embarrassing to be honest, to know that I was on stage acting like a rock star when I knew so little about what I was doing!
Well live and learn. And sometimes we just have to make our own mistakes to learn the lessons. But hopefully if I warn you now, you can avoid making at least that mistake. You can make far bigger strides far more quickly than I did.
You just have to keep your mind open to learning and understanding. It will make you a better player faster. I have no doubt about that.
So let’s get to it!
You can use five common pentatonic scale patterns
In other articles I’ve discussed how the same note can be found in multiple places on the guitar. And, if you consider different octaves, any one note name—say the note A—exists all over the neck.
It stands to reason then, that if you can find any note all over the guitar, then you can find any grouping of five notes—for instance, the pentatonic scale—in various places on the neck. This allows for convenient pentatonic scale patterns that exist up and down the neck.
Knowing these patterns helps the musician to solo and improvise on the guitar. If you’ve ever seen a player flying smoothly up and down the neck while she plays a solo, there’s a good chance she’s moving between the various patterns of the pentatonic scale.
You know that the scale contains five notes. Penta does stand for five, after all. It should come as little surprise then that five comfortable scale patterns exist. Each pattern consists of the same five notes. It’s just that the notes occur in different order depending upon the pattern you use.
The pentatonic scale exists in boxes across the six strings
Each pattern covers generally four frets so that you can pretty much play each without the need to shift hand position in order to reach the notes of the scale. In most cases you could use fingers 1, 2, 3, and 4 to play frets 1, 2, 3, and 4 of the box respectively. We’ll talk about some good reasons not to do that, but technically you could in most every case.
Because you generally use four frets across all six strings, guitar players often refer to the patterns as boxes. You’ll see this more plainly when we lay out the five patterns shortly.
This holds true for both the major and minor pentatonic scales. And in fact, in a stroke of good guitar luck, the major pentatonic scale uses the exact same five box shapes as the minor pentatonic scale. So instead of the need to learn 10 patterns, you have only five to learn.
Finding the location of the five scale patterns
We can easily locate where the five patterns exist up and down the guitar neck. Let’s talk about how to do that with the major pentatonic scale. You can apply the same technique to do it with the minor pentatonic scale later.
Let’s find the location of the five major pentatonic boxes for the key of G major. To do that, we just need to locate each degree of the G pentatonic scale up the Low E string.
In this article we focus mostly on the major pentatonic scale. For a detailed look at the minor pentatonic scale, head over to my Minor pentatonic scale magic article.

First, find the note G at fret 3. That’s the lowest note of Box 1, and it’s the root note of the G major pentatonic scale.
Now we just move up the string to locate the remaining four degrees of the scale. Two frets up we have the note A at fret 5, and that’s the lowest note of Box 2 of the G major pentatonic scale.
Two more frets up, the note B—the third degree of the scale—becomes the lowest note in Box 3 at fret 7.
Remember, the major pentatonic does not include the fourth degree of the major scale, so we skip three frets up to D at fret 10, which becomes the fourth degree of the major pentatonic and the lowest note of Box 4.
Finally, two more frets up takes us to E at fret 12, the fifth degree of the G major pentatonic and the lowest note of Box 5.
Now we know where the lowest note of each of the five boxes sits. Thus we know where each box starts.
The pentatonic scale boxes
Let’s take a close look at all five boxes. And remember, the major and minor pentatonic scales use the same five shapes, so below I’ll talk in terms of the major pentatonic.
However, the same patterns do not exist at the same degree for the major and minor pentatonic scales. So each box has one scale degree for the major pentatonic scale and a different scale degree for the minor. I’ll point that out as we go along.
Conventions used in the following charts
One of the most challenging things about the various boxes involves locating the root note in each pattern. Since the root note plays a key role in melodies and improvisations, you really need to understand where in the box the root notes fall.
This way you can target the root no matter which box you’re in. Not only that, but the root note gives you the point of reference you need in order to quickly locate all of the other notes in the box. This becomes a very important skill in improvisational situations. If you aspire to be a lead guitarist, don’t skip learning where the root notes fall!
In these charts I use a red circle to identify the root notes in the pattern.
Also note that each fingering dot contains two numbers. The first number represents the scale degree. The second number represents the finger you should use to play the note.
Box 1: The pattern starts on the root note
Again, let’s use the G major pentatonic scale for our example. Recall that above we learned that the lowest note of Box 1 sits on the root note of the scale. In the case of the G scale, the root note sits at fret 3 of the Low E string. Play that note with your middle finger.
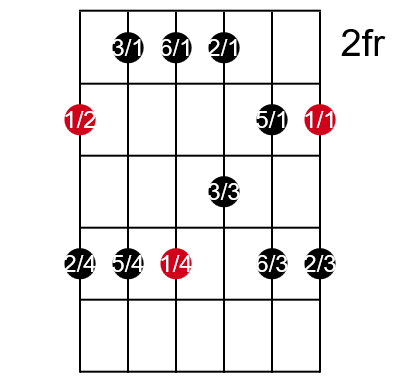
Next, play the second degree of the scale with your pinky at fret 5 of the Low E string. That’s the note A.
Now instead of playing the third note of the scale on the low E string, move up to fret 2 of the A string with your pointer to play the B at that location.
Just like before, skip three frets to play the fourth note. Use your pinky to play it. This puts you on the note D, at fret 5 on the A string.
For the fifth note of the scale, move up to the E at fret 2 of the D string with your pointer.
Finally, reach up three frets with your pinky again to come back to G at fret 5 of the D string. You’ve just played a full octave of the G major pentatonic scale. But of course, you still have three strings, and we can play another octave of the scale using those strings.
Play another octave of the pentatonic scale
Your pinky holds down the root note at fret five of the D string. Move up to the G string and play fret 2 with your pointer for the A note and fret 4 with your ring finger for the B note.
When you move up to the B string, you have to make a fingering choice. Some use the middle finger to play fret 3 for the D note and fret 5 with their ring finger for the E. Doing that means you don’t have to change your hand position.
Others (and I agree with this approach) recommend that you shift to your pointer for the D note and your ring finger for the E note. This fingering puts you in a much stronger position to play bends and slides from those notes into other notes.
We won’t talk about these techniques here, but they play critical roles in many improvisational styles including the blues. And this box is quite often used to play the blues, so that point becomes important.
Finally, move up to the High E string to play the G at fret 3 with the same fingering you used on the B string to complete the second octave. Then, in order to “close” the box, reach up and play the A note at fret 5, again with the same fingering you used on the B string.
Practice pentatonic scale Box 1 until you know it cold
You’ve just moved across the strings to play two octaves of the G major pentatonic scale (plus a little extra) with Box 1. Practice playing this scale up and back down as many times as you need to in order to memorize it.
You need to be able to play this pattern in both directions without even thinking about it. Accomplish that for all five boxes in order to really master the pentatonic scale.
And try to remember particularly where each of the root notes sit in the pattern. This will help you begin to really understand how to use the pattern in your playing.
Note the minor pentatonic scale uses this exact shape, but in that case it’s Box 2.
Position 2: the pattern starts on the second degree
You may have already made the observation that Box 1 consistently uses two notes per string to move through the scale. In fact, all five boxes use two notes per string.
And as I said earlier, the box covers four frets across the six strings. Again, all five of the pentatonic boxes follow this same convention (almost). Essentially this provides the shape that makes these patterns feel like boxes and makes them so easily accessible.
The exception to the four-fret rule
Well, there’s always an exception, right? And that’s Box 2. While Box 2 follows the same two-notes-per-string convention, it has to span five frets to do it. It’s the only box that uses five frets, and thus it’s the only box that requires a slight shift of your hand to play.
To be clear, some of the boxes work better in my opinion if you force yourself into a slight hand shift. This helps you use more useful fingering. But only Box 2 requires a hand shift that you can’t get around.
Learn Box 2 of the major pentatonic scale
Box 2 of the major pentatonic scale (again, we’ll use the G scale for our example) starts with the second degree—the A note at fret 5 of the Low E string. If you want to minimize hand repositioning, hold the E string down at fret 5 with your middle finger.
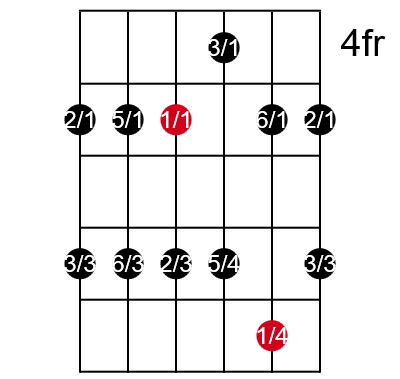
I prefer to use my pointer here because that puts your ring finger in position to play the next note up the scale. Since it’s much easier to bend notes with your third finger, you’re in a better position for bending with this pointer/ring finger combination. That’s the way I’ve written it in the chart.
Notice that since the first three strings both use the exact same frets, this fingering stays in place for a lot of licks.
We don’t need to go through every note of the scale one by one as we did with Box 1 now that you understand the box construction. Just note that, like the Box 1 chart, in the Box 2 chart and the remaining charts, the first number for each note represents the scale degree and the second shows you which finger you should use to play it.
Also note the fret shift that happens when you reach the G string and then the shift back that happens on the B string. Between these two strings you span five frets, and that’s the one exception to the four-fret span of all the other boxes.
Box 3 of the minor pentatonic scale uses the same pattern as Box 2 of the major scale. You might begin to notice that the minor pentatonic boxes have numbers that are always one higher than the same box in the major pentatonic scale.
Position 3: the pattern starts on the third degree
Box 3 starts on the third scale degree with the ring finger. In the key of G, the pointer plays the B note at fret 7 of the Low E string. From there use the chart to find the fingering and the pattern that the box follows.
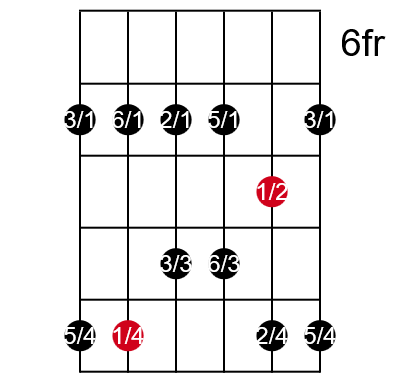
I find this box to be the second most comfortable to play and second easiest to remember. For years this was one of the two boxes I fully understood and could (somewhat) effectively use in a live improvisation.
Therein lies the danger of this box—at least it did for me. If you’re not careful, you may become too comfortable with it. You may rely on it overly much. It’s definitely not a bad thing to master it, but don’t let it become a crutch. Don’t get locked into this pattern or any of the patterns exclusively.
If you limit yourself to just one or two patterns, you severely handicap your creativity and inventive possibilities in your playing.
Box 4 of the minor pentatonic scale uses this same box shape.
Position 4: the pattern starts on the fourth degree
Another one of my favorites, box 4 is comfortable and effective. Again, you can use a couple of different fingerings for this one. I’ll share my preference, but you might want to experiment with alternate ways to find the one that works best for you.
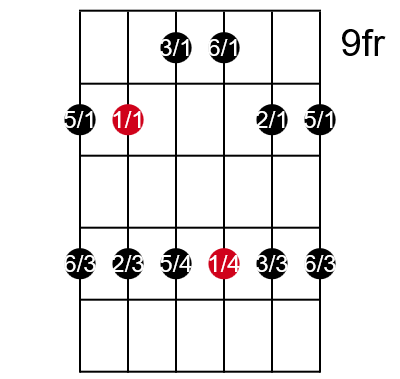
In the key of G, you find the fourth degree of the pentatonic scale, the note D, at fret 10 on the Low E string. Start with your index finger on that note.
Notice in the diagram that you use fingers one and three on the first two strings in my preferred fingering. Then you need to shift your pointer down to fret 9 for the lower notes on the next two strings. Stretch up to the higher notes on those strings with your pinky.
Then, back to fingers one and three on the top two strings. I prefer this fingering even though it requires that one-fret shift of the index finger back and forth between strings. In my opinion, this fingering puts you in a much more natural-feeling position. And, just as back in Box 2, it’s also easier to bend and slide with these two fingers instead of the middle and pinky, which would be the second main option for fingering.
Box 5 of the minor pentatonic scale uses this same pattern.
Position 5: the pattern starts on the fifth degree
Finally, box 5. Although it’s the last of the major pentatonic boxes, it’s the first box of the minor pentatonic scale. It’s by far the most famous of all the boxes and typically the first box that new players learn.
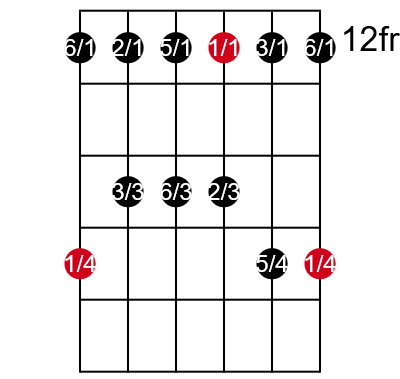
While it’s a fantastic, easy, and comfortable box, nothing will brand you more as an unsophisticated player than sticking to this box exclusively for your playing. While it’s critically important, there’s so much more to playing lead lines than this box!
To play this box in the key of G, start with your pointer on fret 12 of the Low E string. Naturally, you could also play this box an octave lower (in the key of G) by incorporating all of the open strings instead of fretting with your pointer.
As I said, Box 1 of the minor pentatonic scale uses this same pattern.
Patterns within the pentatonic scale boxes help you remember them
One characteristic of the pentatonic scale helps you to learn each box shape. But you might not immediately recognize it. I played for years without knowing it. I wish someone had told me sooner!
Notice that in all cases, the two notes on each string sit either two frets apart or three frets apart. It’s helpful to recognize that the same pattern exists for this note spacing in all five boxes.
Here’s how it works
First, for this technique, disregard the High E string and simply remember that the High E string does whatever the Low E string does.
Now, think of moving through the remaining five strings in a cyclical pattern so that when you get to the B string, you cycle back around to the Low E string.
It’s easiest to see this pattern within Box 3 of the major scale so look at that chart again. Notice that the box starts out with two strings on which the notes sit three frets apart. Then you have three strings on which the notes sit two frets apart.
And that’s the pattern. In each box, you have a set of two strings whose notes sit three frets apart and then a set of three strings whose notes sit two frets apart. Take a look at all of the box charts and see for yourself.
Remember these three rules:
- Disregard the High E string since it does whatever the Low E string does
- Cycle around from the B string back to the Low E in order to complete an incomplete grouping
- Find two adjacent strings with three-fret spacing and three with two-fret spacing
Another example will help
Let’s use Box 5 of the major pentatonic scale. In this pattern, you can easily see the set of three strings—the A, D, and G strings–that have two-fret spacing.
After those three strings, the B string has three-fret spacing. Remember, we have to ignore the High E and cycle back around to the Low E string where we have the second of our three-fret spacing strings.
This works in every case, and this pattern really helps you to quickly identify and memorize the various boxes.
Why is it important to master all five positions of the pentatonic scale?
I mentioned this earlier, but it bears repeating. Don’t let yourself get stuck in just one or two of the pentatonic boxes. You’ll undoubtedly find that you have your favorites. Those boxes that you feel most comfortable using and can play with confidence.
By definition, you will also have your least favorite patterns. The ones you feel the most uncomfortable with. Those that you feel like you can’t really figure out how to use.
It’s critical for your development as a player to break through these limiting preferences. Reach into all five boxes as often as you can. I can guarantee doing so will make you a better player. More importantly, it’ll make you a more interesting player.
The problem with boxes
Clichés become clichés for a reason. And every time you hear someone use the phrase “think outside the box” you might cringe due to that phrase’s over use.
But it’s a very good phrase for you to keep in mind as you’re playing and improvising. Definitely master each of these boxes, but don’t let yourself get stuck in a box. Think outside the box you’re currently in. Play outside the box.
Familiarity and freshness
While everyone wants a touch of familiarity, as I already discussed, people get bored easily. If you stick to one or two boxes, your listener might not understand why your playing seems boring, but they’ll feel it. Access all of the boxes during your improvisations to help keep your playing fresh and inventive.
Of course, no rule states that you have to use all five boxes for every solo or in every song. Just be aware of those times when you might be sticking to your old standby boxes too much or for too long.
Aside from these somewhat esoteric reasons for using all five patterns, some very definable and solid reasons to do so also exist.
Moving up and down the neck by transitioning between positions
You’ll find plenty of players who know one box. Or maybe two. You can identify them easily. As you watch them play, they might never move from one position on the neck. Or, if they do move to a different neck position, their motion seems sudden and jerky. One second they’re playing at one position of the neck and then suddenly they jump to a new position with no logical transition between the two.
Music and improvisation demand smooth transitions every bit as much as quality writing or movie making. You can sometimes use sudden abrupt changes for startling effect in your playing just as in a well-edited movie. But if you do it every time, it just gets annoying.
Use the various boxes as transitional elements
You can use each of the five boxes for an effective base camp for your lead lines. But you can just as effectively use each as transitional vehicles that get you from one area of the neck to another in a fluid, comfortable and interesting way. Each can be the main element, but each can also serve as a transition.
For instance, say you’re concentrating on Box 1 for the beginning of an improvised solo. You’re pretty low down on the neck. As you build up to the exciting conclusion of your solo, you’d like to make your guitar scream out with some high notes up in Box 4.
Instead of just jumping directly from 1 to 4 and branding yourself as a novice, you can pass through Boxes 2 and 3 on your way up the neck. You don’t need to stay in those transitional boxes for long. Maybe just pick a few notes out of each on your way through.
Before your audience knows what hit them, you can be in Box 4 wailing away. You’ve just taken your listener on a smooth, immersive journey up the guitar neck. You’ve played smooth transitions that will keep them firmly in the zone you put them in with the beginning of your solo back in Box 1.
Use the boxes between where you are and where you want to be to create smooth solos and lead your listeners through an experience instead of a shock.
Each of the five patterns connects to those around it
But how do you use the boxes transitionally? How do you know how to move from one box to the next? Use box connections.
Compare Boxes 1 and 2. Notice that all of the higher notes on each string in Box 1 are the exact same notes played on the same frets as the lower notes in Box 2. The fingerings differ, but the scale degrees match. Look at the scale degrees in the charts to see this.
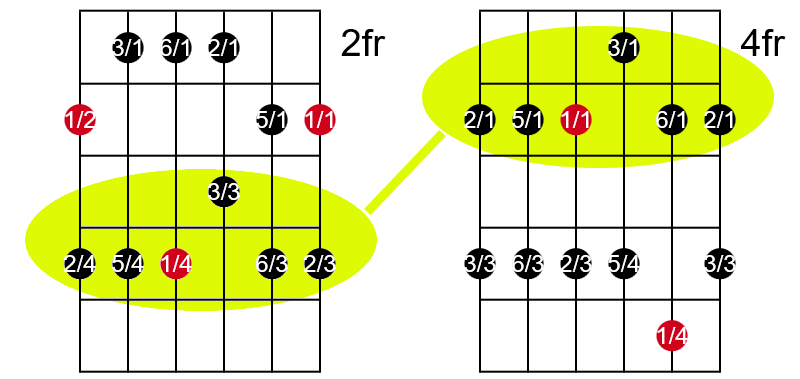
That same relationship exists for the highest notes on each string in Box 2 and the lowest in Box 3. They are the same notes.
So, Box 2 shares its lower-position notes with Box 1 and its higher position notes with Box 3. Each box shares notes with the box that comes before it and the one that comes after it in every case.
A transitional idea
You can use this fact for your transitional moves. For instance, say you’re wailing away in Box 5 of the major pentatonic scale and you want to move up to Box 1 just above it. (Remember, each box can repeat itself one octave higher up the neck, so when you move up to the next box from Box 5, you cycle back around to Box 1).
For a great way to transition from Box 5 to Box 1, reach up to play the higher note of the G string in Box 5 with your middle finger instead of your ring finger as you normally would. Once you hit that note, instantly slide up two frets.
Your middle finger now sits on the higher note of the G string in Box 1 and you’re in the perfect position to climb up the rest of the way in Box 1 to the two notes on the B and E strings with your pointer and ring fingers.
Simple slides up or down like this one can serve as great transitional moves that take you from one box to the next.
What’s the difference between the major and minor pentatonic scale?
I’ve made a big point to make sure you know that the five minor pentatonic scale patterns are the same as the five major pentatonic patterns. So if they’re the same, why do we bother to differentiate them?
The key to that answer lies in the root note. Recall that although the five patterns are the same, Box 1 in the major scale does not serve as Box 1 in the minor scale. While a major box has the same shape as one of the minor boxes, they exist in different positions on the fretboard and the scale degrees differ.
For instance, Box 1 of the minor pentatonic scale has the same configuration as Box 5 of the major pentatonic scale.
In Box 1 of the minor pentatonic scale, the root note sits beneath your pointer finger as the lowest note of the box. In Box 5 of the major pentatonic scale, you find the root note as the second-lowest note of the pattern which sits under your pinky.
So two critical things make up the difference between a box in the minor pentatonic scale and the same box in the major pentatonic scale:
- First, while the two boxes have the same shape, you play them on different frets
- Second, you target different notes in the shape as the root note of a minor scale as compared to the major.
Relative pentatonic scales
Interestingly, the two boxes can have another relationship besides shape. As I said, the root note of Box 5 of the major pentatonic scale sits under your pinky. If you move up and play that same note as the root note of Position 1 of the minor pentatonic scale, you’re using the same Box to play in the relative minor key of the original major scale.
I talked about the concept of relative minor in my article Discover how to play major key solos so you don’t have to sell your guitars. I also covered the idea of relative minor keys more fully in my article What does relative minor mean and why does it matter?. Read those two articles if you’d like to know more.
Conclusion
We’ve come a long way in our study of the pentatonic scale. The scale dates back tens of thousands of years to some of the oldest instruments ever discovered.
It would seem that the five notes which make up the pentatonic scale, whether major or minor, have been part of human history since the beginning.
The scales eliminate much of the tension present in the full major and minor scales from which they derive, and thus provide familiar and comfortable ground for the musician and listener.
You can play both the major and minor pentatonic scales in five different positions across the guitar neck with five different patterns. Both use the same patterns but in different locations and with different root note targets.
To play sophisticated solos, lead lines, and improvisations, you need to master all five patterns of the pentatonic scale. You must also understand where the root note falls in each pattern for both major and minor scales.
The pentatonic scale provides a great basis for creating exciting solos and improvisations.